How to Read a Knitting Pattern, First Time
 By Fernando Santos
The first knitting pattern I opened made no sense to me whatsoever. Rows of letters, a grid of coloured squares, numbers running up the side. I sat there genuinely convinced there had been a class I missed. There hadn’t been. A pattern is only a set of directions, and once you know what each part is for, you can open any pattern in the world and get on with it.
So this is a walk through a real pattern, in the order you actually meet it. Every picture below is lifted straight out of one of ours, so what you see here is what you will be holding.
You don’t read it like a book
Here is the most freeing thing I can tell you, and I wish someone had told me on day one. You never need the whole pattern in your head at once. At any given moment you only need three things:
- Your size
- Your gauge
- The row you are on
Everything else is reference. It sits there quietly until you need it, exactly like the notes at the bottom of a recipe.
What I would do is read the whole thing through once before you cast on, the way you would skim a recipe before cooking. Not to memorise it. Just so nothing further down the page catches you by surprise when you are halfway through a row with a ball of wool in each hand.
First page: your numbers
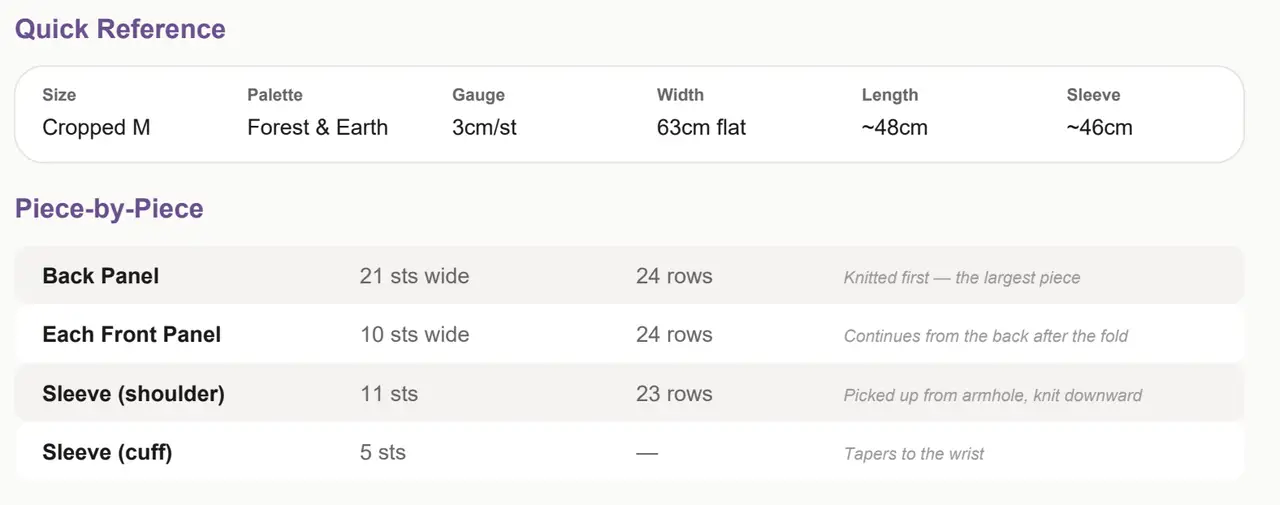
Quick Reference is the summary of your finished cardigan in six numbers: the size you chose, the colourway, the gauge, and roughly how wide, how long and how long in the sleeve it will come out. If you only ever glance at one box, glance at this one. It tells you what you are about to spend a fortnight making.
Piece by Piece tells you what the cardigan is actually built from, and this is where two abbreviations turn up for the first time. Sts means stitches. R means row. So “21 sts wide, 24 rows” is a panel twenty-one stitches across and twenty-four rows tall. That is the whole mystery.
You will also notice our back panel and front panels have the same row count. That is because a Gigante cardigan is knitted as one piece, folded at the shoulders, so there are no shoulder seams to sew. The sleeves come later, picked up around the armhole and knitted downward.
Gauge: the one number that decides everything
Gauge, sometimes called tension, is simply how big one stitch comes out in your hands. Ours is written as a measurement per stitch, and it matters more than anything else on the page.
Two people can use the same wool, the same needles and the same pattern and finish with cardigans a full size apart, purely because one of them knits tighter than the other. Neither is doing it wrong. That is why a pattern asks you to knit a small square first and measure it: not to test you, but to find out which of those two people you are.
Gauge is not a rule you obey. It is a measurement of you.
If your square comes out with bigger stitches than the pattern expects, you go down a needle size. Smaller, you go up. I have written the whole thing out properly in what size needles to use for chunky wool, including how to swatch without losing an afternoon to it.
Next page: the shopping list
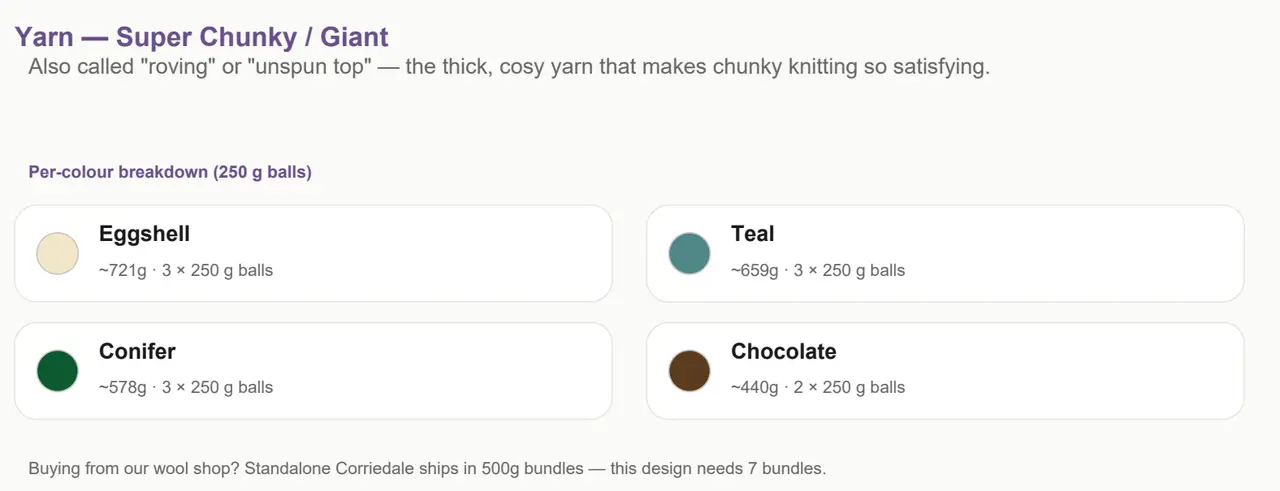
What You’ll Need breaks the yarn down colour by colour, with a weight and a ball count worked out for your size specifically. Nothing to calculate, nothing to guess.
This page is also where you meet the word roving, sometimes written as unspun top. It is the same thick, soft, barely-twisted wool you can see in every photo on this site, and it is what gives chunky knitting its enormous stitches.
One line on this page is worth reading twice: buy about ten per cent more wool than the number says, and buy it all in one go. Wool is dyed in batches, and two balls of the same colour bought months apart can be very slightly different shades. In a giant stitch, slightly is visible.
The chart: a picture of your knitting
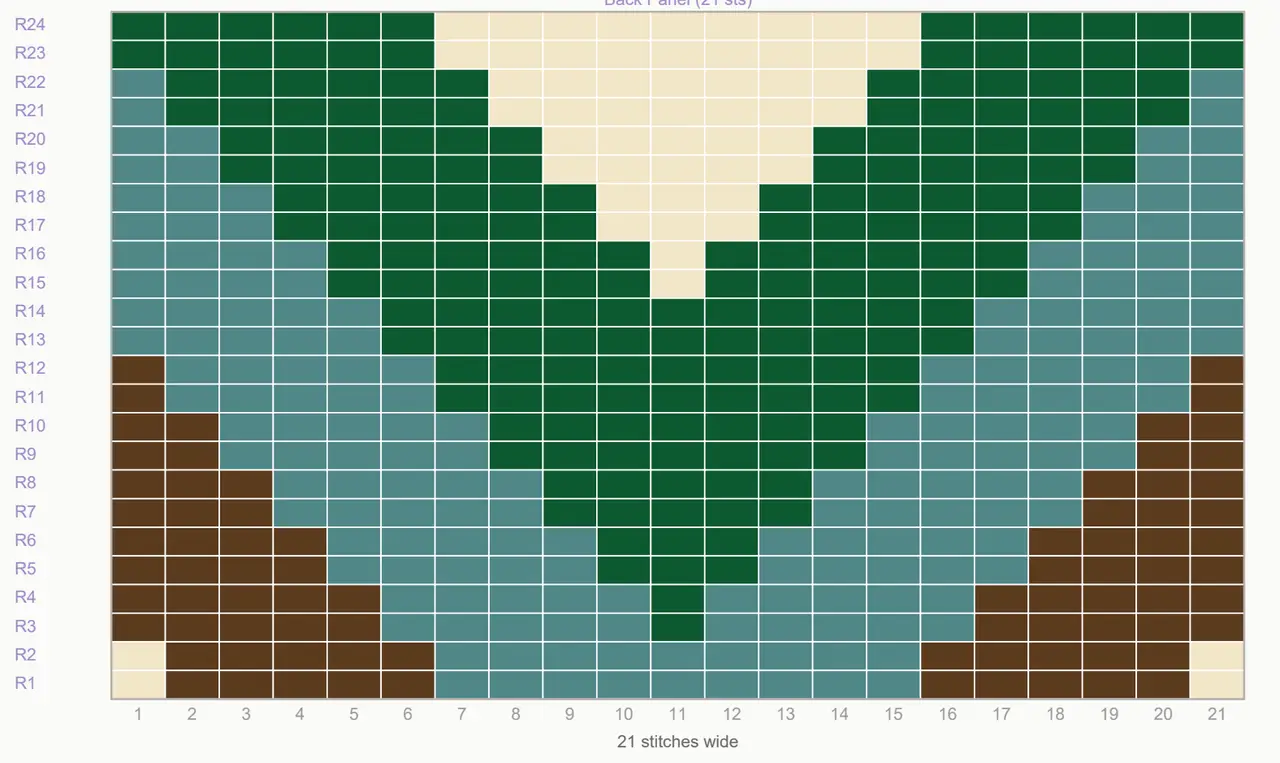
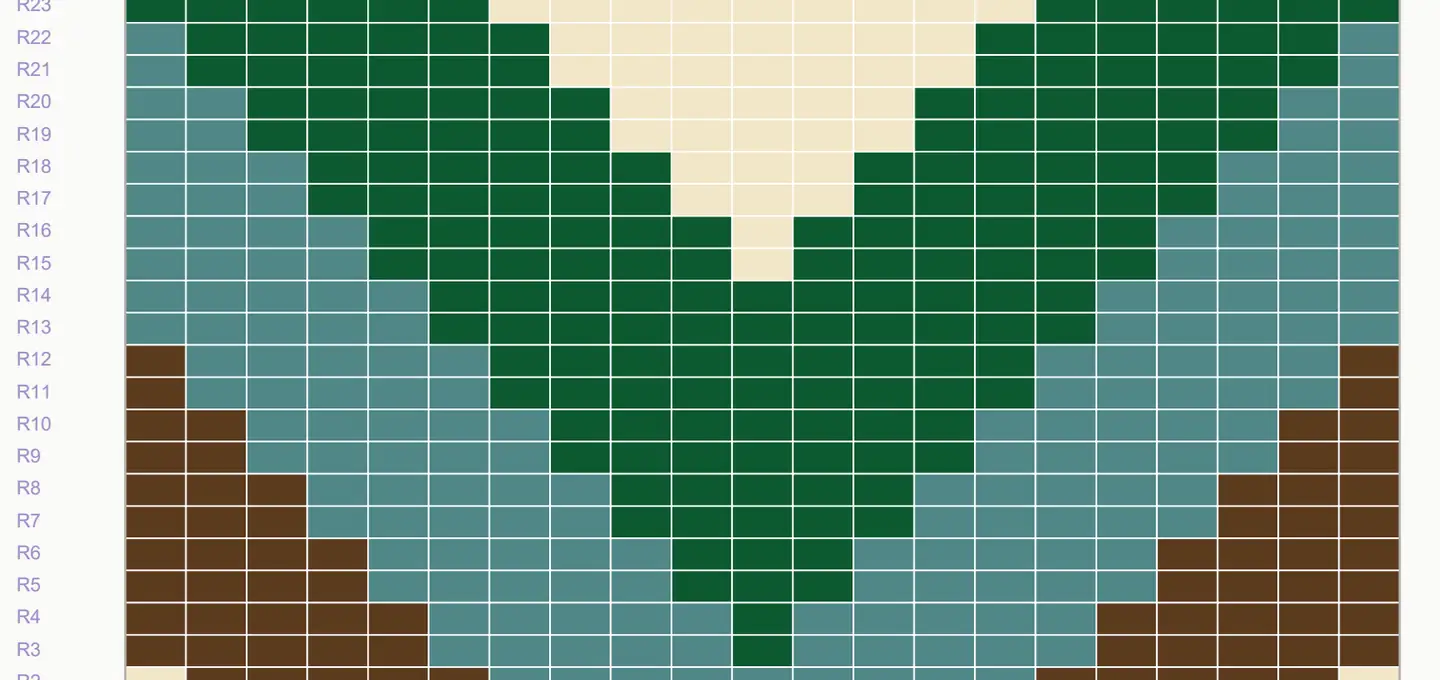
This is the part that frightens people off, and it really shouldn’t, because the chart is the friendliest page in the whole document. It is a picture of your fabric seen from the front. One square is one stitch. The colour of the square is the colour of wool you knit that stitch in. That is genuinely all it is.
Four rules sit at the top of every chart we produce:
- R1 is the hem. Rows are numbered from the bottom upward, the same direction your knitting actually grows.
- Right side rows read right to left. The right side is the outside of the cardigan, the side the world sees.
- Wrong side rows read left to right. The wrong side is the inside.
- If you are using needles, right side rows are knit and wrong side rows are purl.
That right-to-left business trips everyone up at first. There is a reason for it: you are looking at the front of the fabric, but when you knit a wrong side row you are physically working across the back of it, so the chart has to be read the other way round to match your hands.
Reading an actual row
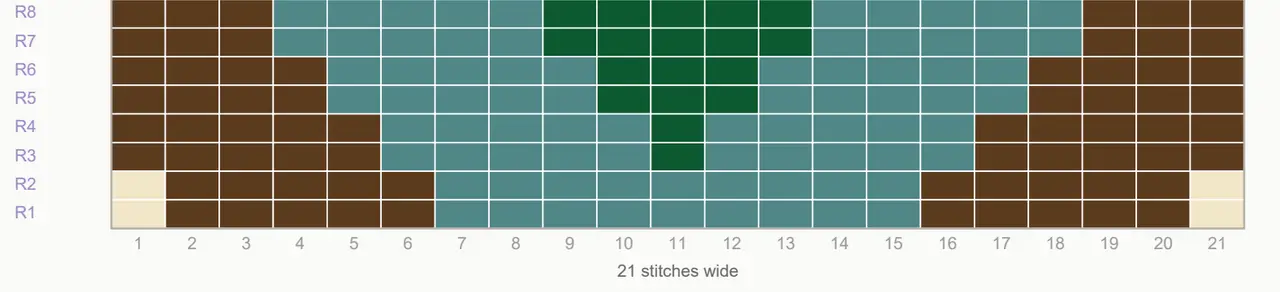
Let’s do the first row properly. Find R1 at the bottom left, then read that row of squares: one cream stitch, five brown, nine teal across the middle, five brown, one cream to finish. Twenty-one stitches, which matches the “21 sts wide” you saw in the Piece by Piece table earlier. Those two numbers agreeing is your proof you are in the right place.
Then look at R2. It is identical. Most designs open with a couple of plain rows before anything interesting happens, which is a kindly way to begin: you get to find your rhythm before you have to think.
The numbers along the bottom are stitch numbers. They are there for one job, and it is the job you will be most grateful for: when you lose your place, count along the bottom until you find the stitch you are on, and you are back.
The abbreviations you actually need
Knitting has hundreds of abbreviations. You need about eight, and every one of them is printed in the glossary at the back of our patterns so you never have to remember any of it:
| Short for | What it means |
|---|---|
| Sts / R | Stitches / row |
| RS / WS | Right side (outside) / wrong side (inside) |
| CO / BO | Cast on / bind off: starting and finishing your knitting |
| K2tog | Knit two together: a decrease that leans right |
| SSK | Slip, slip, knit: a decrease that leans left |
| Intarsia | Colour work with a separate ball per colour block, twisted where they meet |
| Picking up sts | Making new live stitches along a finished edge, which is how our sleeves start |
| Blocking | Wetting and shaping the finished piece so it settles properly |
Everything above is only half of what you get
I have been showing you PDF pages, because that is what most people picture when they hear the word pattern. But every Gigante pattern arrives in two forms, and you get both. There is the printable PDF, and there is a full digital construction guide that opens in a browser on any phone, tablet or laptop. Same pattern, same numbers, two different ways to use it.
The PDF is the one to print and leave on the arm of the sofa. No battery, no screen dimming halfway through a row, and you can scribble on it, which I recommend.
The digital guide is the one I would actually knit from, and I say that as the person who designed the PDF. It does a handful of things paper simply cannot:
- It opens a step at a time. Body, seams, sleeves, finishing, care and the glossary each fold open on their own, so you are looking at the bit you are doing instead of a wall of instructions.
- The chart is on screen at a size you can read, and Knitting View blows it up to fill the whole display when you want to work straight from it.
- The Row Ruler marks the row you are on and remembers it. This is the one I would not knit without now. Put the project down for three weeks, come back, open the guide, and it still knows exactly where you stopped.
- The masterclass video sits inside the guide, at the step it belongs to, so when a sentence is not landing you can just watch me do it.
Paper is easier to scribble on. The screen is easier to knit from. You get both, so use whichever suits the moment.
When you lose your place, and you will
Everybody loses their place. It is not a sign you have gone wrong, it is a sign you were knitting while the kettle boiled. If you are in the digital guide, the Row Ruler above is the whole answer: tap it, mark your row, and the guide holds your place until you come back.
And whether you are on paper or on screen, three habits save me every single time:
- Photograph it every ten rows. Then when you look up and cannot tell which row you are on, you scroll back and count forward from a picture instead of guessing.
- Count your stitches at the end of a row. If the chart says twenty-one and you have twenty, you dropped one, and finding it now is a two-minute job rather than a two-hour one.
- Lay your colours out in order before you start. Nothing derails a row like hunting through a bag for the right ball.
If you prefer a counter you can tap rather than a ruler on a chart, there is a free row counter on the site. It is not locked behind anything and it is not only for our patterns, so use it with whatever you happen to be knitting.
Practise on a pattern that costs you nothing
Reading about a pattern only gets you so far. If you would like to have one open in front of you while all this is still fresh, The Sovereign is free. It is the first cardigan I ever made, and it is laid out exactly like the pages above, so you can find each section, poke at it, and see that none of it bites.
And if you get stuck on a line of a pattern and cannot work out what it wants from you, email me. I would far rather answer a question than have somebody quietly give up.
Keep reading
Can a Beginner Knit a Chunky Cardigan? Where to Start, Honestly
Yes, you can. Big stitches are forgiving, fast, and the best place to start.
Read it next →